

Do you want to learn more about Google Analytics 4? Then check out this step-by-step guide to get the most out of your new Google Analytics 4.
- How do I set up a Google Analytics 4 property from scratch?
- How do I enable enhanced measurement events in GA4?
- Where can I find enhanced measurement events in GA4?
- How do I activate Google Signals in GA4?
- How do I exclude internal traffic in Google Analytics 4?
- How do I link my Google Ads with my Google Analytics 4 property?
- How do I set up Site Search in Google Analytics 4?
- How do I set up Scroll Tracking in Google Analytics 4?
- How do I connect my Google Analytics 4 property with Google Search Console?
- How do I connect Google Analytics 4 with Big Query and why?
- How do I set up a GA4 test property?
- How do I set up a GA4 Custom Events with Google Tag Manager?
- How do I set up Conversion Tracking for tracked events in Google Analytics 4?
- How do I find and calculate the conversion rate of each goal in Google Analytics 4?
- How do I reduce Direct Traffic results in Google Analytics?
- How do I create Landing Pages Report in Google Analytics 4?
- How do I use the DebugView report in Google Analytics 4?
- How do I create custom insights in Google Analytics 4?
- How do I build comparisons in Google Analytics 4?
- How do I collect Universal Analytics Events in Google Analytics 4?
- How do I exclude referral traffic and create the unwanted referral traffic list in Google Analytics 4?
- How do I create a Google Ads report in Google Analytics 4?
- How do I import my conversions from Google Analytics 4 to my Google Ads account?
- How to create a Path Exploration Report in Google Analytics 4?
- Recap:
How do I set up a Google Analytics 4 property from scratch?
How do I set up a Google Analytics 4 property?
- Go to https://analytics.google.com/analytics/
- Click on “Start Measuring”.
- Provide a name for your account.
- Click “Next” after providing the name.
- Provide a “Property Name” and select “Reporting Time Zone” and “Currency”.
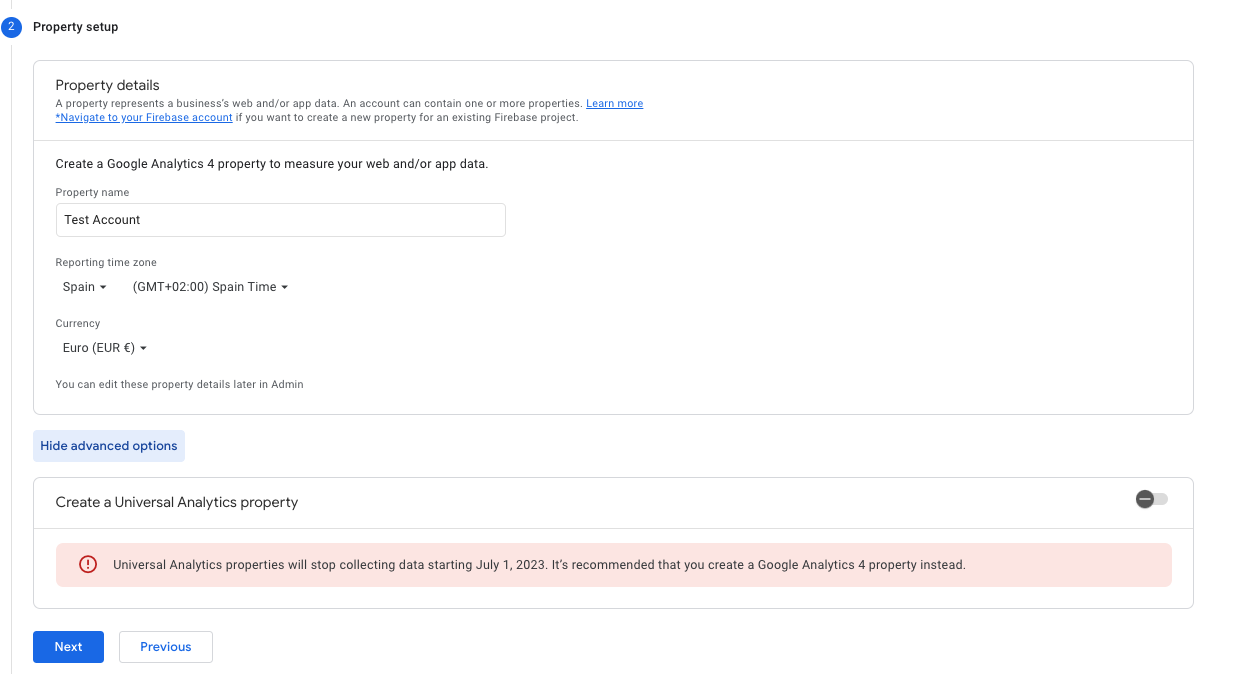
- You no longer need to create a Universal Analytics property.
- Click “Next”.
- Add some information about your business.

- Accept the “Google Analytics Terms of Service Agreement”.
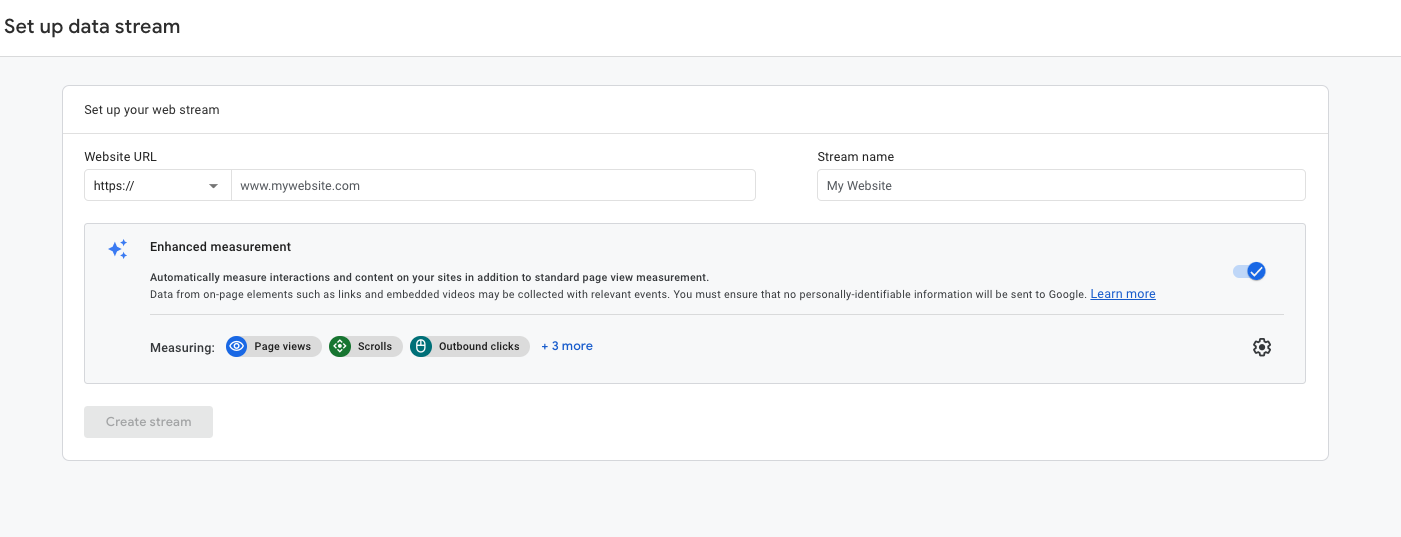
- Set up a data stream to start collecting data
- As we are setting up a data stream for a website, we use “Web”.
- Enter the website URL and the stream name and click “Create Stream”.
- Now add the GA4 tracking code script in the <head> section.
- Copy and Paste the GA4 tracking code script that you can find under “Data Streams”.
- Go to “Admin” and choose “Data Streams” under the property section.
- Click on the “Data Stream”.
- Click on “Global site tag (gtag.js)” under “Tagging instructions”.
- Copy the global site tag into the <head> section of your HTML. Let us know if you can’t do it yourself and we will help you with that.

How do I enable enhanced measurement events in GA4?
How to enable enhanced measurement events in GA4?
To enable GA4 enhanced measurement events follow the steps below:
- Navigate to GA4 and click on “Admin”.
- Click on “Data Streams” under the “Property” column.
- Click on the web data stream.
- Toggle on the switch button next to “Enhanced measurement”.
- Choose the ones you don’t want to track.
- Click “save” and done!
Where can I find enhanced measurement events in GA4?
Just follow the 2 steps below to be able to find a list of all your enhanced measurement events in Google Analytics 4:
- Navigate to your reporting view.
- Click under “Events” on “Engagement”
- There you find a list of all the enhanced measurement events that have been recorded in GA4.
How do I activate Google Signals in GA4?
Google Signals is a reporting feature that collects cross-device data from users that have signed into their Google accounts and chose ad personalisation.
Follow the steps below to activate Google Signals in Google Analytics 4:
- Navigate to the “Admin” section
- Click on “Data Setting” under the “Property” tab.
- Click on “Data Collection”.
- Click on “Google signals data collection” and click “Get started”.
- Click on “Continue” and then “Activate”.
- After 24 hours you can navigate to the “Demographics overview” and check the user data by gender, interest and age.
By activating Google signals, you enable Google Analytics to collect data about your traffic in addition to data collected through a standard Google Analytics implementation in order to provide additional features like cross-device audiences and insights.
(Source: Google)
How do I exclude internal traffic in Google Analytics 4?
You should exclude internal traffic from your Google Analytics 4 report because they interact with your site differently than other visitors. Their reasons for being on the site are usually much different than a potential customer’s.
Follow the next steps to exclude internal traffic from your GA4 reports:
- Go to “Admin”.
- Click on “Data Streams” under the “Property” section.
- Choose the right Data Stream.
- Go to “More Tagging Settings”.
- Click on “Define internal traffic”.
- Click ‘Create’ to begin.
- Choose traffic_type value “Internal”.
- Enter IP address.
- Click “Create”.
How do I link my Google Ads with my Google Analytics 4 property?
Follow the next steps to link your Google Ads with your Google Analytics 4 property.
- Go to “Admin”.
- Click on “Google Ads links”.
- Click on “Link”.
- To link a GA property to a Google Ads account, you must have ‘edit’ permissions on the GA property and admin access on the Google Ads account.
- Choose the Google Ads account.
- Click “Confirm”.
- Toggle “Enable Personalised Advertising” on.
- Click “Submit”.
It may take up to 24 hours for your Google Ads link to begin displaying data.
How do I set up Site Search in Google Analytics 4?
Follow the steps below to set up Site Search in GA4.
Site search events provide insight into the different user queries that users are looking at on the website.
- Go to “Admin”.
- Click on “Data Streams”.
- Choose the Data Stream.
- Click on “Enhanced measurement” and switch on “Site Search”.
- You can adjust which parameters to look for under advanced settings.
How do I set up Scroll Tracking in Google Analytics 4?
Scroll tracking is a method of tracking how users scroll throughout your website. Scroll tracking provides insight into the non-interaction behavior of users on your site.
Follow the steps below to set up Scroll Tracking in GA4:
- Go to Google Tag Manager and click “Tags”
- Click “New” to set up a new event for your property.
- Give your event a name and click on “Tag Configuration”.
- Choose “Google Analytics: GA4 Event” under “tag type”.
- Click on “Select Configuration Tag”.
- Choose “None – Manually Set ID”.
- Copy the Measurement ID from Google Analytics. (You can find this under “Data Streams”)
- Paste the Measurement ID into the box.
- Choose the Event Name by clicking the “+” symbol.
- Choose the variable “Scroll Depth Threshold”.
- Add % and the word “Scroll” after the brackets.
- Choose trigger conditions.
- Click “+”.
- Give the trigger a name.
- Choose “Scroll Depth”.
- Select “Vertical Scroll Depth” option.
- Add percentages.
- Click “Save”.
How do I connect my Google Analytics 4 property with Google Search Console?
Google Search Console provides data about what users see in Google search results before they choose to click on your website’s link. Use this data to identify opportunities.
Follow the steps below to connect your GA4 property with your Google Search Console.
- Go to “Admin”
- Click on “Search Console links”.
- Click “Link”.
- A pop-up with “Link setup” will show where you can choose the account.
- To link a GA property to a Search Console property, you must be a verified site owner of the Search Console property and have ‘edit’ permissions on the GA property.
- Choose the property you want to link.
- Click “Confirm”.
- Click “Next”.
- Choose a “Data Stream” and click “Next”.
- Review and click “Submit”.
- Go to “Report Snapshots”.
- Choose “Library”.
- Find “Search Console”.
- Click on the three dots.
- Click “Publish”.
- Now you can see the Search Console data under the “Reports snapshot” column.
Do you want to learn more about Google Search Console and how to set up a new property, then check out the following article.
How do I connect Google Analytics 4 with Big Query and why?
The GA4 BigQuery connection provides the opportunity to conduct an in-depth analysis of business performance and user interactions.
Follow the steps below to connect your Google Analytics 4 with BigQuery:
- Go to https://console.cloud.google.com/bigquery
- Click the drop down button and choose “NEW PROJECT”.
- We will use this project to collect and query GA4 data into BigQuery. Choose a name and click “Create”.
- Choose the newly created project from the drop down menu.
- Go to Google Analytics and click on “Admin”.
- Go to “Product Links” and choose “BigQuery links” and click “Link”.
- Link to a BigQuery project you have access to.
- Choose “Frequency” and click “Next”.
- If you see “LINK CREATED”, then all is good.
- Now navigate to https://console.cloud.google.com/apis/dashboard.
- Ensure the right BigQuery project is selected.
- Click on “+ENABLE APIS AND SERVICES’ button.
- Search for BigQuery and choose “BigQuery API”.
- Click “Manage”.
- Click on “Credentials”.
- Click on “Create Credentials and choose “Service Account”.
- Enter firebase-measurement@system.gserviceaccount.com as the account name.
- Click on “Create”.
- Click on “Done”.
- Wait for 24 hours.
- Go to the BigQuery account and select the correct project.
- Now you see the data set name “analytics_<property_id>”.
How do I set up a GA4 test property?
Every change you make can permanently change your current analytics data. Therefore you should create a separate GA4 testing property.
Follow these steps to create a test property on Google Analytics 4:
- Go to your existing property and click “Admin”.
- Click on “Create Property”.
- Give your test property a name.
- Select the timezone and currency and click “Next”.
- Select industry category and business size.
- Specify how you intent to use GA and then click “Create”.
- Click on the “Web” data stream to start collecting data.
- Enter the URL and the stream name and click “Create Stream”.
- Copy the measurement ID and go to Google Tag Manager.
- Click on “New Tag”.
- Give your tag a name, e.g. “GA4 Test Property”.
- Choose the tag type “Google Analytics GA4 Configuration”.
- Paste the “Measurement ID”.
- Choose “All Pages”.
- Click “Save”.
- Go to all tags and click on the one you just created.
- Click “Submit”
- Choose “Publish and Create Version”
- Give the version a name and hit Publish.
- Done.
How do I set up a GA4 Custom Events with Google Tag Manager?
Custom events are events that you define. Make sure you only create custom events when no other events work for your use case.
Follow the steps below to create your own custom events with Google Tag Manager:
- Click on “Tags” in your Google Tag Manager account.
- Choose “New”.
- Give your tag the name “Button Click” and click “Tag configuration”.
- Choose “Google Analytics: GA4 Event” and click on “Select Configuration Tag”.
- Choose “None – Manually Set ID”.
- Enter your “Measurement ID” from your GA4 Data Stream.
- Enter “Button Click” in the event name box.
- Click on “Event Parameters”.
- Click on “Add Row”.
- Choose “button_name” for the Parameter Name.
- Click “+” next to the “Value” field.
- Choose “{{Click Text}}”.
- Click into the “Triggering” box.
- Click on the “+”.
- Name your trigger.
- Choose “All Elements” trigger type.
- Choose “Some Clicks”.
- Choose “Click Classes” and add the class for the button.
- Click “Save”.
- You can now preview the new trigger and will find the event “Button Click” in your GA4 property.
How do I set up Conversion Tracking for tracked events in Google Analytics 4?
Analyzing conversions can tell you whether visitors are engaging with your marketing efforts and successfully moving through the different steps in the sales funnel.
Follow the steps below to set up Conversion Tracking for tracked events in Google Analytics 4:
- Click on “Configure” in your Google Analytics 4 property.
- Click on “Events”.
- Choose the important events that you want to track as a conversion and “Mark as conversion”.
- If an event hasn’t been triggered yet and doesn’t appear in the table, click New conversion event in Conversions to preemptively mark the event as a conversion.
- Click on the “Conversion” tab under “Reporting and you will now see those events as conversions.
How do I find and calculate the conversion rate of each goal in Google Analytics 4?
Do you want to know the conversation rate metrics in Google Analytics 4?
Easy!
Just follow the next steps:
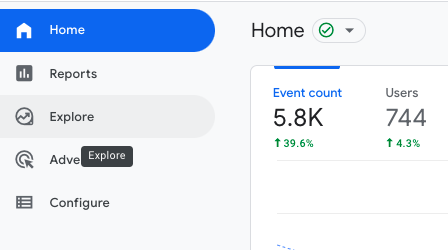
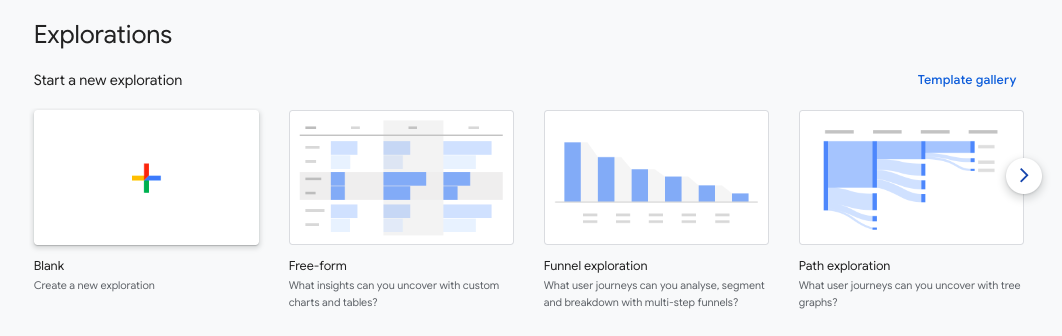
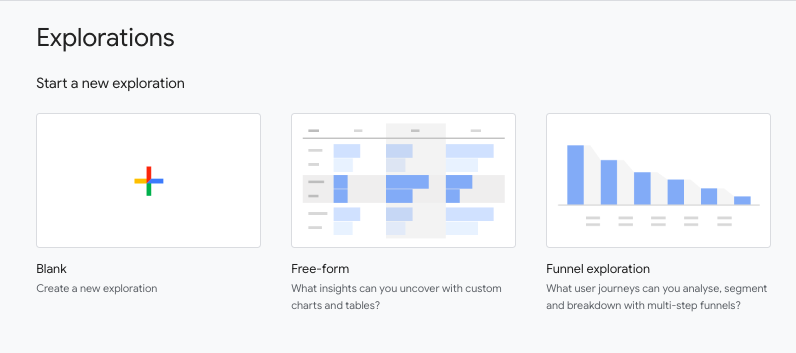
- Navigate to “Explore”.
- Choose the “Blank” report.
- Give your report a name.
- Choose the date range.
- Click on “+” next to Dimensions.
- Choose “Event Name”.
- Double click on the newly created dimension.
- Click on “+” next to “Metrics”.
- Select “conversions”, “user conversion” and “session conversion rate”.
- Click “Import”.
- Double click on the newly created metrics.
- You have successfully created a report for the conversion rate metrics.
How do I reduce Direct Traffic results in Google Analytics?
You can use the following steps to reduce direct traffic numbers in your Google Analytics reports:
- Tag all URLs of your marketing campaigns.
You can use Google’s URL Builders to tag your campaign URLs correctly. You can add parameters (such asutm_source,utm_medium, andutm_campaign) to a URL to capture reporting data about the referring campaign. The following link would allow you to identify the traffic to example.com that came from a particular email newsletter, as part of a particular campaign: https://example.com?utm_source=news4&utm_medium=email&utm_campaign=spring-summerBlock internal traffic. - Check your firewall settings.
- Don’t just check Google Analytics for your referral data.
How do I create Landing Pages Report in Google Analytics 4?
Google Analytics 4 doesn’t provide a Landing Pages Report and you therefore need to create one. With this report you can determine the top landing pages or your website.
Just follow these steps below to create Landing Pages Report in Google Analytics 4:
- Go to “Admin” and click on “Explore”.
- Click “Blank” to create a new exploration.
- Give your new report the name “Landing Pages”.
- Click on “+” next to “Dimensions”.
- Search for “Landing Page” and click “Import”.
- Double click on “Landing page” and it gets added to “Rows”.
- Click on “+” next to “Metrics”.
- Add: Views, Sessions, Engaged Session, Total users, New users, Engagement rate, Average Engagement Time per Session, Conversions, Total revenue.
- Now double click on each of those metrics and add them to the right hand side.
How do I use the DebugView report in Google Analytics 4?
In order to start using DebugView in GA4, you need to enable debug mode in your browser. To enable this on your mobile device or your browser you need the Google Analytics Debugger Chrome Extension.
The following steps will guide you through the process:
- Install and activate by clicking on the symbol of the Google Analytics Debugger Chrome Extension.
- Go to your website and right-click and select “Inspect”.
- A new window will open on the side and now click on “Console”.
- Now refresh the site.
- Navigate to your Google Analytics property and click on “Configure”.
- Click on “DebugView”.
- The Seconds stream (the middle column) shows the events that have been logged during the last 60 seconds. The Minutes stream (the left column) shows a series of archives of events over the last 30 minutes. The right column shows the Top Events logged during the 30-minute period, as well as the Current User Properties for the currently selected development device.
How do I create custom insights in Google Analytics 4?
Google Analytics provides two types of insights: Automated insights and custom insights. Let’s learn how to create custom insights in GA4:
- Click on “Report Snapshot”.
- Click on “View All Insights”.
- Now click on “Create”.
- If you want to define your own rules to create a custom insight click on “Create”.
- Select “Frequency”. I suggest selecting “Weekly”.
- Then you can select “All Users” or select a segment of users.
- If you want to choose a segment of users, you can include or exclude a certain group of users.
- All Users is the default segment. Click Change to select other dimensions and dimension values. You can also specify whether to include or exclude the segment.
- Select the metric, condition, and value to set the threshold that triggers the insight. If you choose “Has anomaly” for the condition, then Analytics determines when the change in the metric is anomalous, and you do not need to enter a value.
- Give your newly created insight a name.
- Add an email of the users that need to be notified under “Manage notifications”.
- You can now see your custom insight under “View All Insights”.
- If you want to edit or delete a custom insight then click on “Manage” and then the three dots next to your custom insight.
How do I build comparisons in Google Analytics 4?
If you want to compare valuable data side by side, you need to create comparisons in Google Analytics 4. Previously, those were segments and filters in Universal Analytics properties.
With comparisons, you can analyze a subset of data.
Let dive in and find out how to create a comparison in Google Analytics 4:
- Select a reporting tab where you want to create a comparison.
- Click “Add comparison”.
- Now define the conditions for the comparison based on dimensions and dimension values.
- You can add up to five conditions in a single comparison.
- Click “Apply” and Done!
- If you want to add more comparisons then you can add up to five different comparisons.
How do I collect Universal Analytics Events in Google Analytics 4?
If you collect data for a Universal Analytics property and a Google Analytics 4 property (via dual tagging with analytics.js and gtag.js), you can use a single setting in your Google Analytics 4 property to automatically capture the following Universal Analytics hits:
- Event hits (i.e. Category/Action/Label events that you collect using analytics.js)
- Timing (load-time events)
- Exceptions
Let’s find out how to do this by following these steps:
- Click Admin.
- Click Data Streams, then click the relevant web data stream.
- Under Additional Settings, click More Tagging Settings.
- Under Event Settings, turn on the switch for Collect Universal Analytics events.
How do I exclude referral traffic and create the unwanted referral traffic list in Google Analytics 4?
Often self referral occurs when GA reports activity as coming from one’s own domain. To minimize wrong data or to show only relevant data for your marketing, you can exclude referral traffic reporting. The Referral Exclusion List is a list of domain names that Google Analytics treats as Direct traffic instead of referrals.
If you want to create the unwanted referral traffic list in Google Analytics 4, then follow the steps below:
- Click on “Admin”.
- Click on “Data Streams”.
- Choose your data stream and click on “More Tagging Settings”.
- Choose “List unwanted referrals” option.
- Click on the pencil icon.
- Add the domain name you want to add to the unwanted referral list and click on “Save”.
How do I create a Google Ads report in Google Analytics 4?
Google Analytics 4 doesn’t provide an existing report to measure the performance of your Google Ads. There is a way to create a Google Ads report by using the exploration report templates.
Let’s dive in and follow the steps below to create your custom Google Ads report in GA4:
- Link your Google Ads account to your Google Analytics 4 property.
- Choose “Explore” on the left hand side of your Google Analytics dashboard.
- Click “Blank” to start a new exploration.
- Give your report a name (e.g. “Google Ads Report”).
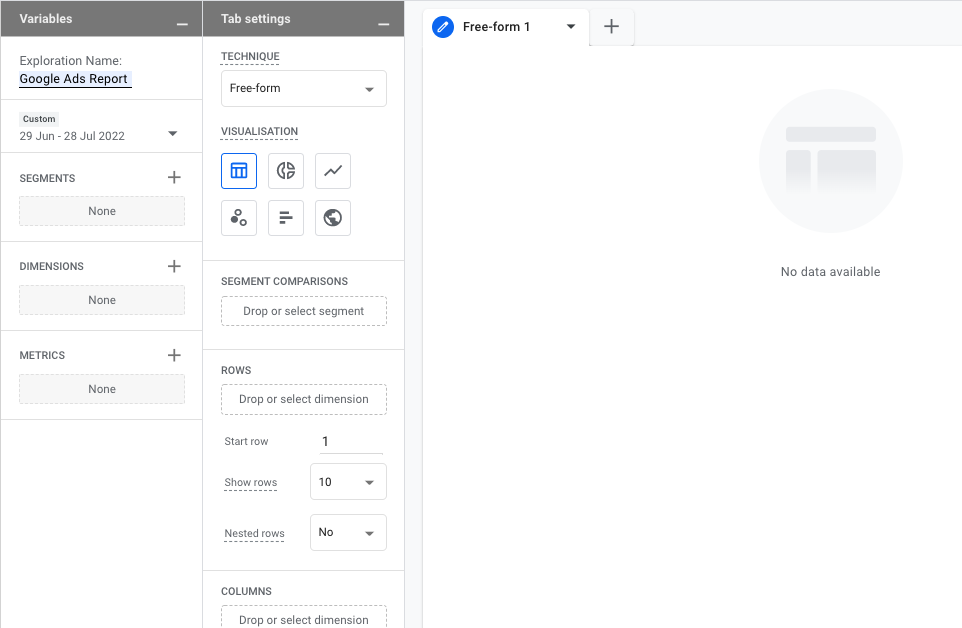
- Click “+” next to “Dimensions”.
- Search for “google ads”.
- Choose the dimensions you want listed in your report and click “Import”.
- Click “+” next to “Metrics”.
- Search for “google ads”.
- Choose the metrics you want listed in your report and click “Import”.
- Double click on the dimensions to add them to the report on the right.
- Double click on the metrics to add them to the report on the right.
- Done!
How do I import my conversions from Google Analytics 4 to my Google Ads account?
If you want to import your conversions from Google Analytics 4 to your Google Ads account then follow these steps:
- Sign in to your Google Ads account.
- In the top right, click Tools and Settings .
- Go to Measurement and choose Conversions.
- Click “+ New conversion action”.
- Click Import.
- Select “Google Analytics 4 properties”, choose “Web” and click “Continue”.

- Select each conversion event you want to import, then click Import and continue.
- Click “Done”.
How to create a Path Exploration Report in Google Analytics 4?
The path exploration report shows you the pages the users have visited and what actions they have performed.
Here you see an example of a path exploration report:
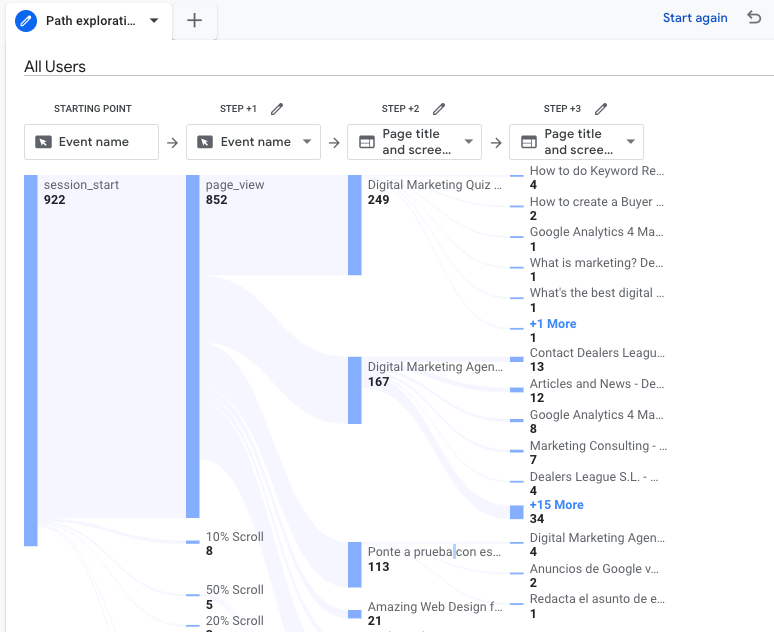
Do you want to learn more about the path exploration reports and how to create one? Just follow the simple steps below and you will create your custom report in no time.
- Go to your Google Analytics 4 property and click “Explore”.
- Click on “+”.
- Give your exploration a name.
- Choose “Path exploration” under “TECHNIQUE”.
- CLICK ON “Start again”.
- Drop a dimension into the first field. This defines where your path starts.
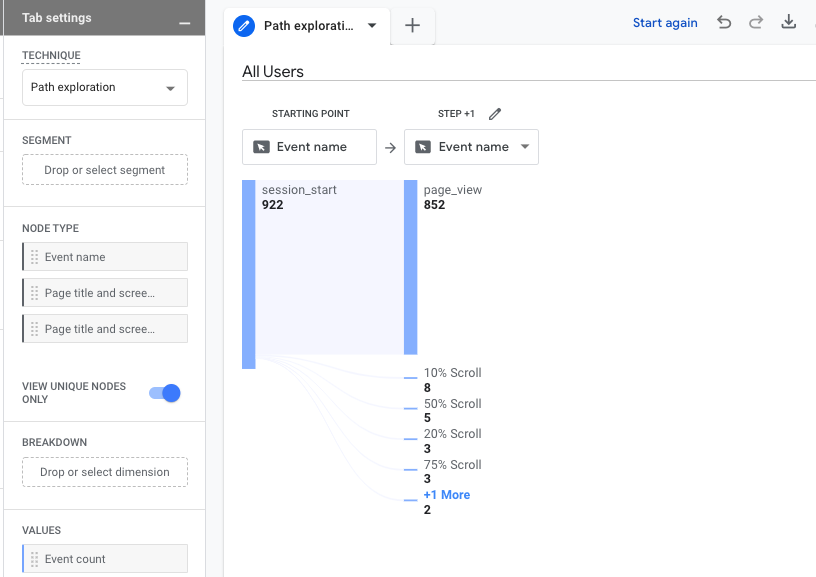
- Under “Step +1” you can choose whether you want to show the page titles or the events that happened on your landing page.
- If you double-click on the blue bar, it will add another step to the path.
- Just try it out and play around with it and you will see what the path shows you.
Recap:
We hope it is now easier for you to work with Google Analytics 4. We will add additional information to this post and create a comprehensive list of actions to take once you have set up your new GA4 property. Why don’t you check out our article about how to perform a Google Analytics audit?
This article has been updated on the 29th of August to include additional information.
About the author: Michael Masa
Why should you listen to me? With a rich marketing background and a passion for sharing knowledge, I have dedicated the last 9 years of my life to the field. I have worked as Marketing Director and have been instrumental in shaping the marketing strategy of one of Europe’s leading insurers, BAVARIA AG.
Prior to my current role, I spent 12 years as Sales Director, managing a team of 12 dynamic people and applying the latest sales techniques to drive success. This experience allowed me to hone my leadership skills and gain a deep understanding of the sales industry.
I am now at the helm of Dealers League, a marketing agency that not only creates and manages websites for businesses, but also focuses on the importance of effective marketing strategies. Recognising the need for continuous learning in this fast-paced industry, we offer courses on the latest marketing techniques.
My varied experience in sales and marketing gives me a unique insight into how these two crucial areas intersect. I look forward to sharing my knowledge and insights with you through this blog.

